


Thanks for the post in PCBeta: http://bbs.pcbeta.com/viewthread-1576145-1-1.html
The introduction of WIMBoot: https://technet.microsoft.com/zh-cn/library/dn594399.aspx
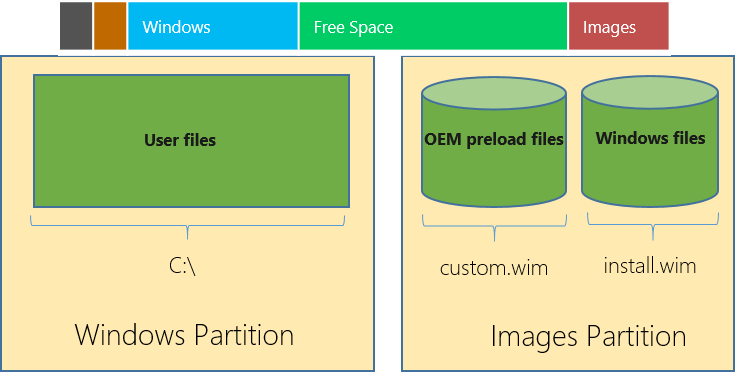
WIMBoot partition layout:
.png)
According to https://technet.microsoft.com/zh-cn/library/dn605112.aspx,ARM devices don’t need a MSR partition (The post in PCBeta suggests adding a MSR partition, it is not necessary).
Please noted, the way provided below to make a custom USB recovery drive needs you to get your serial number of your RT device. If you don’t enter your serial number after you recover the device, you cannot activate your device.
This guide can be used for any Window RT devices in theory, but you will need to get your own recovery image and drivers, etc.
Please use it at your own risk!
The download links of all the files mentioned in this article (The built recover images, drivers and ESD files is ONLY for Surface 2):
The way to get serial number of Windows RT without jailbreak your device:
http://bbs.pcbeta.com/viewthread-1402890-1-1.html
The official Surface 2 recovery image (zh-cn):
http://pan.baidu.com/s/1eQvkALO
The official site to get your own Surface recovery image (You will need to login your Microsoft account and register your device):
Windows RT devices offline updates download:
ESD Decrypter:
Windows 8.1 with Update ESD:
zh-cn:
en-us:
How to download RT ESDs in other languages:
The drivers you need to put into the image for Surface 2:
http://pan.baidu.com/s/1eQs2NJG
The final built recovery image (zh-cn):http://pan.baidu.com/s/1mgoSISC
Steps:
1. Unpack Surface official recovery (ZIP) to C:\unpacked。Edit C:\unpacked\sources\ResetConfig.xml.
The document of ResetConfig.xml:
https://technet.microsoft.com/en-us/library/jj127002.aspx
Edited ResetConfig.xml:


<?xml version="1.0" encoding="utf-8"?>
<Reset>
    <SystemDisk>
        <WIMBoot>1</WIMBoot>
        <MinSize>10240</MinSize>
        <DiskpartScriptPath>CreatePartitions-UEFI.txt</DiskpartScriptPath>
        <OSPartition>2</OSPartition>
        <RestoreFromIndex>1</RestoreFromIndex>
        <WindowsREPartition>3</WindowsREPartition>
        <WindowsREPath>Recovery\WindowsRE</WindowsREPath>
        <RecoveryImagePartition>3</RecoveryImagePartition>
        <RecoveryImagePath>Windows Images</RecoveryImagePath>
        <RecoveryImageIndex>1</RecoveryImageIndex>
    </SystemDisk>
</Reset>
2. Edit CreatePartitions-UEFI.txt in the same folder。
Edited CreatePartitions-UEFI.txt:
convert gpt
create partition efi size=100
format quick fs=fat32 label="System"
assign letter=S
create partition primary
shrink minimum=4096
gpt attributes=0x0000000000000000
format quick fs=ntfs label="Windows"
assign letter=W
create partition primary
set id=de94bba4-06d1-4d40-a16a-bfd50179d6ac
gpt attributes=0x8000000000000001
format quick fs=ntfs label="Images"
assign letter=I
rescan
exit
3. Unpack downloaded RT updates(MSU) to C:\updates. Execute the following command to update boot.wim(PE) from 5.0 to 5.1.
MD C:\m
dism /Mount-Wim /WimFile:D:\unpacked\sources\boot.wim /Index:1 /MountDir:C:\m
dism /Image:C:\m /Add-Package /PackagePath:C:\updates\Windows8.1-KB2919442-arm.msu
dism /Image:C:\m /Add-Package /PackagePath:C:\updates\Windows8.1-KB2919355-arm.msu
dism /Image:C:\m /Add-Package /PackagePath:C:\updates\Windows8.1-KB2932046-arm.msu
dism /Image:C:\m /Add-Package /PackagePath:C:\updates\Windows8.1-KB2934018-arm.msu
dism /Image:C:\m /Add-Package /PackagePath:C:\updates\Windows8.1-KB2937592-arm.msu
dism /Image:C:\m /Add-Package /PackagePath:C:\updates\Windows8.1-KB2938439-arm.msu
dism /Image:C:\m /Add-Package /PackagePath:C:\updates\Windows8.1-KB2959977-arm.msu
dism /Unmount-Wim /MountDir:C:\m /Commit
RD C:\m
4. Use ESD Decryptor to decrypt the ESD file to install.wim. Add drivers to install.wim. (Because the install.wim in original recover image is too old to support WIMBoot, so we download the newest ESD to get install.wim. You can also add all the updates to install.wim, but it will make install.wim very large, so I don’t choose this way.)
MD C:\m
dism /Mount-Wim /WimFile:C:\decrypted\install.wim /Index:1 /MountDir:C:\m
dism /Image:C:\m /Add-Driver /Driver:C:\drivers\FileRepository /Recurse
dism /Image:C:\m /Add-Driver /Driver:C:\drivers\Install /Recurse
dism /Image:C:\m /Add-Driver /Driver:C:\drivers\InstallDependent /Recurse
dism /Unmount-Wim /MountDir:C:\m /Commit
RD C:\m
5. Delete the original install.wim:
del D:\unpacked\install.wim6. Export install.wim for it to support WIMBoot (This is a MUST step):
dism /Export-Image /SourceImageFile:C:\decrypted\install.wim /SourceIndex:1 /DestinationImageFile:D:\unpacked\install.wim /WIMBoot7. Copy all the files in C:\unpacked to a FAT32 USB Drive.
8. The official guide of how to use the recovery USB drive:
https://www.microsoft.com/surface/zh-cn/support/warranty-service-and-recovery/usbrecovery